Oh well, look who’s here. A fellow blogger in sight: Ambitious, full of enthusiasm and with an intention of starting up a blog –without spending too much, much like any other novice blogger just starting his/her journey. I welcome you –my fellow blogger to a guide which will help you on how to start a blog with very low amount of investment.
I would like to make it clear at the very beginning that this guide isn’t meant to provide a “cheap” way of starting a blog. I mean it IS cheap (about $4/month) but not cheap cheap –if you get my point. We will be starting up a blog with a professional domain name and robust hosting –without spending too much, and still get to set up your blog reliably. Think of this as a “frugal” way of doing this.
Dude, I’ve heard cheap always means cheap
Of course, that’s exactly what I’ve heard and I believe it too. That’s why we are taking benefits of offers provided by SiteGround to new users to start an inexpensive blog. This way, they will give you –their new customer, a bunch of welcome gifts. They will provide discounts on your signup –discounts they don’t provide to their regular customers.
This way, we aren’t actually going for a cheap way of starting a blog but a professional way at a discounted rate.

What does this $4/month expense cover?
By spending $4/month = $48/year –you will be getting a year of domain name and super fast, reliable and robust hosting for your blog. You can get your professional email on your domain, you get more than enough space for a blog and other perks -everything just in right amount to help you start a new blog.
Okay, so why SiteGround?
Because, SiteGround is my own host, I know how good they’re at what they do, I have my own experience with them, and overall, I can speak for their reliable services because I already use them. You can’t speak for services you don’t use yourself, you see. I’m not a brand ambassador of SiteGtround or something –I’m just a fan – trying to create more fans.
As a host, SiteGround is truly a robust service provider. Their customer service staff is well-trained and they know what they’re doing. They have their own set of tools to improve performance, speed and security for their customers -at very competitive price (with regards to their service) than other hosts. My experience with them has always been great -greater than any host before.
[mks_button size=”small” title=”All SiteGround Features” style=”squared” url=”http://frunction.com/to/siteground” target=”_new” bg_color=” #AA8BBF” txt_color=”#FFFFFF”]Four dollars a month? Seriously? I’ve seen cheaper
I know, a $4/month expense will still sound as too much to many, but it isn’t. You don’t want to settle down with a cheap host just because they’ve some coupon thing going on and regretting later. You should start with professional services from the beginning if you’re serious about blogging (and making money).
What will this guide cover?
- Buying a new domain name
- Buying a new hosting account
- Installing WordPress
Perquisites
- Some knowledge of the Internet, blogging, web hosts etc.
- Credit/Debit card to purchase your hosting (nope, it’s not free)
- Patience
- Common sense (Oh come on. Don’t give me that look!)
If this sounds convincing enough for you and you’re excited to begin your blogging journey, let us proceed, shall we?

How to start a blog for less than $4 a month?
Step 1: Choosing Right Hosting Plan
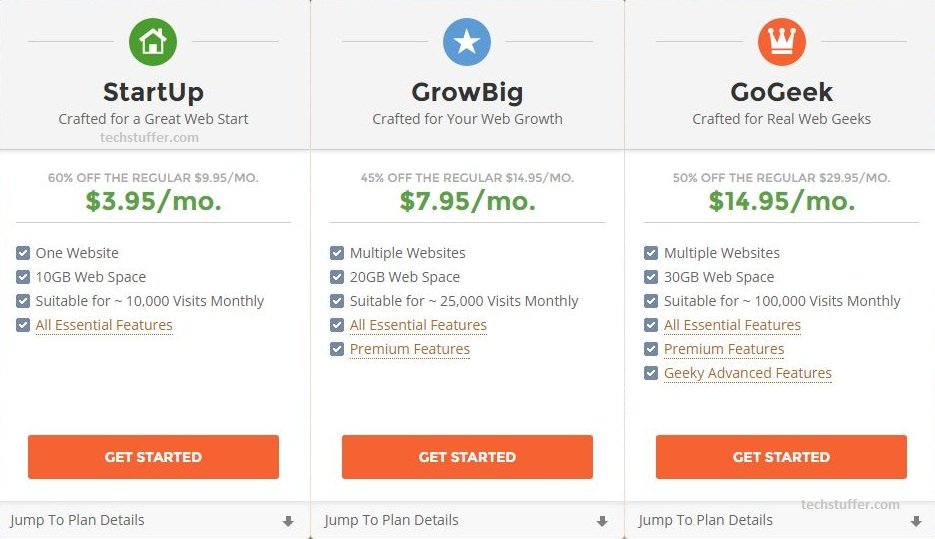
Like most other web hosts, SiteGround offers more than one hosting plan. They have StartUp, GrowBig and GoGeek plans. We will be choosing their StartUp hosting plan which will cost us $3.95 per month –that’s a straight 60% discount on their regular price (new member perks, you see?).
SiteGround’s StartUp plan is perfect for new bloggers who are just beginning their journey. You need a single domain to begin with –and SiteGround will give it to you for free! This way you will be saving at least $10-$15 every year on domain renewals. Click here to learn more about SiteGround StartUp plan.
So, we will choose SiteGrond’s StartUp plan to begin with. Go to SiteGround hosting page and click Get Started under StartUp plan.
Step 2: Selecting Domain Name (free)
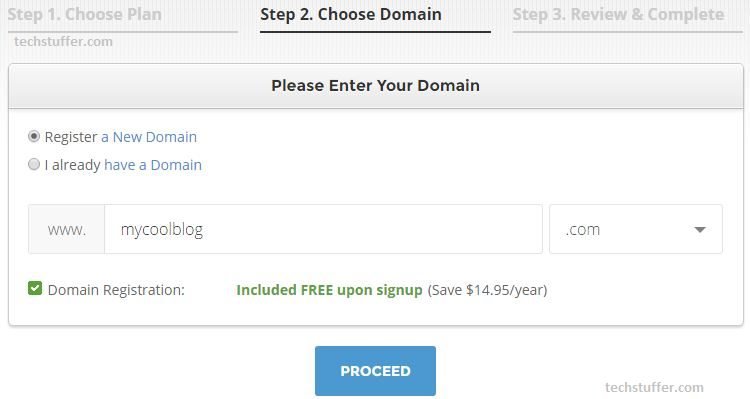
Now that you get a forever free domain name with SiteGround, let us register it. Enter the domain name you wish your blog to have and click Proceed. For example, enter yourcoolblog and your blog address will be www.yourcoolblog.com.

Remember, you can avail your free domain only when you register your new hosting account. This can’t be done at a later time and you’ll have to pay $14.95/year for a domain.
Step 3: Creating a SiteGround Account, Confirming Order
Well, oh well. You are at the final step. Here, you will have to enter your contact details and other information like email and password.
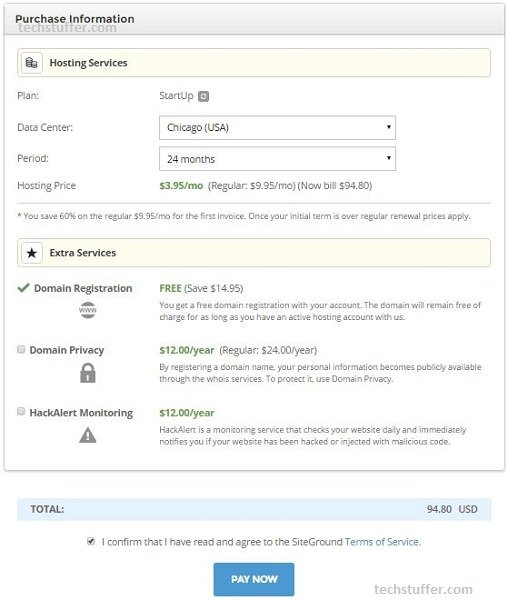
Once you enter you details carefully, scroll down to Purchase Information area where you will be choosing your server location. SiteGround has data centers in Chicago (USA), Amsterdam, Singapore and London. Choose the data center location which is closest from the country of your targeted audience. If you target audience from USA, Canada etc, choose Chicago. If you target audience from Asia, then choose Singapore.
After this, choose the period for which you would like to purchase the hosting. I would recommend you go for at least two years. Just to remind you, the 60% discount on your hosting is for new customers/new orders only. So you will not get the same discount after your hosting service expires after a year and you’ll be paying regular hosting charges.
By choosing more than one year, you save 60% for two or more years. It depends on your budget, but if you can afford two or three years –go for it and save money. You can ask for a refund in 30 days if you’re not satisfied with their service (which I highly doubt).
In the same area, you can add/remove extra services provided by SiteGround. Domain Privacy and HackAlert Monitoring –both these services aren’t free and will not allow us to stay on our budget of $4/month. Remove these services (you can add them later if you wish –and have money).
Step 4: Payment
Oh boy –we have to pay now (It was meant to be inexpensive, not free). So scroll up and enter your card information under Payment Information area. After you’ve entered your payment information, it’s time to check everything before proceeding.
Check your contact details. Make sure you have strong password. Cross-check your payment information. And at last, check if you have selected your hosting plan, data center, and hosting period. Make sure you have removed unnecessary services and finally –check you total cost.
Once you’ve checked everything and made corrections, you are ready to click the I Agree checkbox as well as Pay Now button. So go on and click Pay Now button. Wait for the page to load and get your payment done.
After your payment is successful, you are ready to jump into the shiny new world of blogging. As soon as your payment is accepted, your account is created and you will receive two emails from SiteGround. First email will contain your Sale Receipt. Second one will be regarding order confirmation and will include other information.
Receiving email confirmation means the first part of this guide is over: You now have your own domain and hosting and you’re just good to go. Easy, wasn’t it?

Well, you now have a a domain and powerful hosting ready to help you launch your blog. Continue reading to learn how to start a new blog.
Support Me: If this article/tutorial helped you today, please consider supporting me and help me run frunction.com


