In my previous article, I showcased my reasons of moving my sites to CDN and why I chose KeyCDN to be my preferred provider. Since I first configured KeyCDN with my new site as a trial, I have been highly impressed by its performance. I have since moved all three of my WordPress sites to KeyCDN. In this step by step guide, I wanted to show how to configure KeyCDN with WordPress.
KeyCDN: A Brief Introduction
KeyCDN is one of the most affordable and robust CDN service providers out there. Their pay-as-you-go plan offers exceptional performance at a price of merely $0.4 per GB. Their price is the most suitable (and affordable) for most bloggers who can’t afford the service other CDN providers.
KeyCDN currently has their edge servers in 25 POPs (Point of Presence) with a bunch of other servers already under planning.
Their servers are 100% SSD-optimized and some other notable features include free SSL with Let’s Encrypt, HTTP/2 support, Cross-Origin Resource Sharing (CORS) support – just to name a few.
If you are looking for a powerful CDN provider for your sites without putting a huge hole in your pocket, KeyCDN can be considered as the best solution available at the moment.
How to Configure KeyCDN with WordPress
Setting up KeyCDN is a fairly east task. They have made their integration with WordPress even easier with their CDN Enabler plugin.
If everything goes as expected, you will be able to get KeyCDN running on your sites in about 10 to 15 minutes.
Requirements
A KeyCDN account. Get a free account here. You don’t need to pay anything or provide a credit card to get an account. You can get a full-featured trial of KeyCDN free for 30 days.
An ability to manage your DNS entries, if you wish to use your own sub-domain for CDN (eg. cdn.example.com) instead of the default one.
10 to 15 minutes of your time, along with patience and tea/coffee/beer/soda/energy drink as you may please.
Step 1: Creating a KeyCDN Account
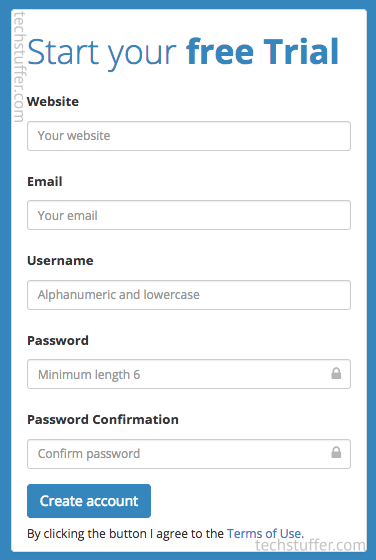
If you don’t have a KeyCDN account yet, go create one. Just enter your username, email, password and site URL to create an account.
If you create an account by following this link, you will get $10 credit with 250GB of bandwidth to test their service. 250GB is more than enough bandwidth for most bloggers who wish to try KeyCDN.
Wait for them to send you an email with an activation link. Click that link and activate your account. Once your account is active, you’re ready to configure KeyCDN with WordPress.
Step 2: Creating A Pull Zone
Now that your account is active, you can begin the configuration. The first thing you need to do is to create a pull zone for your domain.
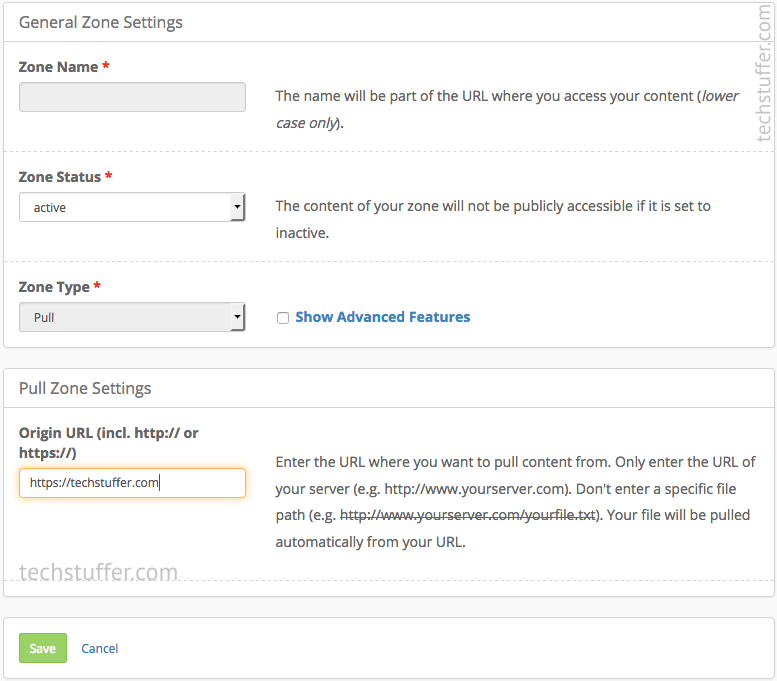
Go to Zones and click Add Zone.
Enter a zone name that makes sense to you. You can enter a short string like ‘exmpl’ (without quotes) if your site is example.com.
Make sure ‘Active’ is selected under Zone Status. Zone Type will be ‘Pull’ and Origin URL will be your domain name with http:// or https:// as applicable. My site is configured with https so I will enter https://techstuffer.com here. If your site isn’t configured with https, enter http:// followed by your domain name.
Now it’s time to play with some advanced options. Click ‘Show Advanced Features‘ and a number of other options will be available.
Now change settings as below, leaving other options untouched.
- Force Downloads: Disabled
- CORS: Enabled
- GZip: Enabled
- Expire: Leave unchanged (10080 by default)
- Block Bad Bots: Enabled
- Allow Empty Referrer: Enabled
- Secure Token: Disabled
- HTTP/2: Enabled
- SSL: Keep disabled if your site isn’t using an SSL certificate. Select Let’s Encrypt if you wish to configure a free SSL certificate for your zone. I am using Let’s Encrypt for my site and I want my CDN connection to be encrypted as well. So I will select Let’s Encrypt here.
- Force SSL: Enabled (if you select a SSL method above)
Leave all other settings unchanged, unless you know what (and why) you are doing.
If you want your CDN URL to forward the visitor to your origin domain, enable Forward Host Header. If someone types your CDN URL (cdn.example.com), they will be redirected to the origin domain (example.com).
If your origin server supports Cache Brotli, you can enable it. If you don’t know what it is or if your host doesn’t support it, leave it disabled.

Click Save once you have selected the settings as required. Ta-da! Your brand new pull zone has just been created.
It will now take about 5 minutes to get your pull zone deployed. While KeyCDN is deploying your zone, you can go ahead and create a CNAME entry in your DNS.
Step 3: Create CNAME
This step is optional – used only for Zone Alias. If you want your CDN URL to reside on your own domain, you should create a CNAME entry. What it will do is to point your CNAME entry (cdn.example.com) to your actual zone URL (exmpl-12Xx.kxcdn.com).
I recommend you use a zone alias. If you happen to change your CDN provider later, you will be able to use the same zone alias with it, too.
If you choose to go ahead with such setup, you will need a zone alias. In order to create a zone alias, you will need to create a CNAME entry first.
To do so, log in to your cPanel, and go to Advanced DNS Zone Editor. Select your domain name from the list. Under Add a Record, enter details as follows.
- Name: cdn.example.com (Replace cdn with any term of your choice. cdn just works fine, though. Replace example.com with your own domain.)
- TTL: Set a numeric value like 1800 or 3200 here.
- Type should be – CNAME.
- CNAME should be your Zone URL as it shows in your KeyCDN dashboard. (it looks something like exmpl-12Xx.kxcdn.com)
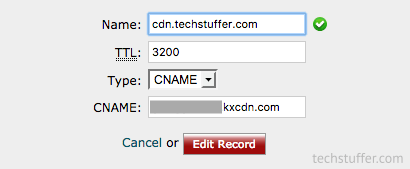
Click Add Record and a new CNAME entry will be created. It will take some time before it goes live on the network. The time it will take will depend on your server.
Step 4: Create Zone Alias
This step is optional, too. Followed only if you decided to go ahead with a zone alias setup and followed Step 3 above.
Okay, so far you have created a new KeyCDN account and your trial has started. You created a zone for your site and added CNAME entry in your DNS. By now, your zone should have been deployed and you are ready to serve your site’s content via CDN.
Before you start doing so, you need to create a zone alias which will help you get your own CDN URL like cdn.example.com.
To add a zone alias, head over to KeyCDN dashboard > Zonealiases. Click Add Zonealias.
Now enter your alias exactly as you entered it in ‘Name’ field while creating a CNAME entry in the previous step (cdn.example.com).
Select your zone from the list below and click Add.
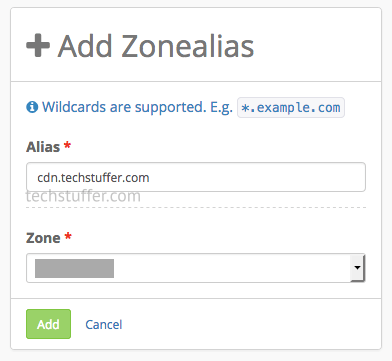
If your DNS is able to resolve your CNAME as expected, a new zone alias will be created. If not, then it will show an error. If it shows an error, you may need to wait for a little more before DNS changes are applied by your server.
After the zone alias is created successfully, you will need to wait for about 5 more minutes before KeyCDN deploys it.
Step 5: Using KeyCDN to Serve Your Assets
You are near the end of this process. All you need to do now is to tell WordPress to serve your site’s content from your CDN. You have a few options to do so.
The easiest option is to install a plugin called ‘CDN Enabler.’ This plugin is developed by KeyCDN and will simply allow you to enter your CDN URL via its settings.
I also use their Cache Enabler plugin to enable better caching. It’s optional to use, though.

Install the ‘CDN Enabler’ plugin, activate it, and go to its settings. Enter your CDN URL in this fashion: http:// or https:// (if you configured SSL in KeyCDN zone) – followed by your zone alias, without the trailing slash (/). For example, you can enter https://cdn.example.com.
If you configured SSL with your zone, you should turn CDN HTTPS option on.
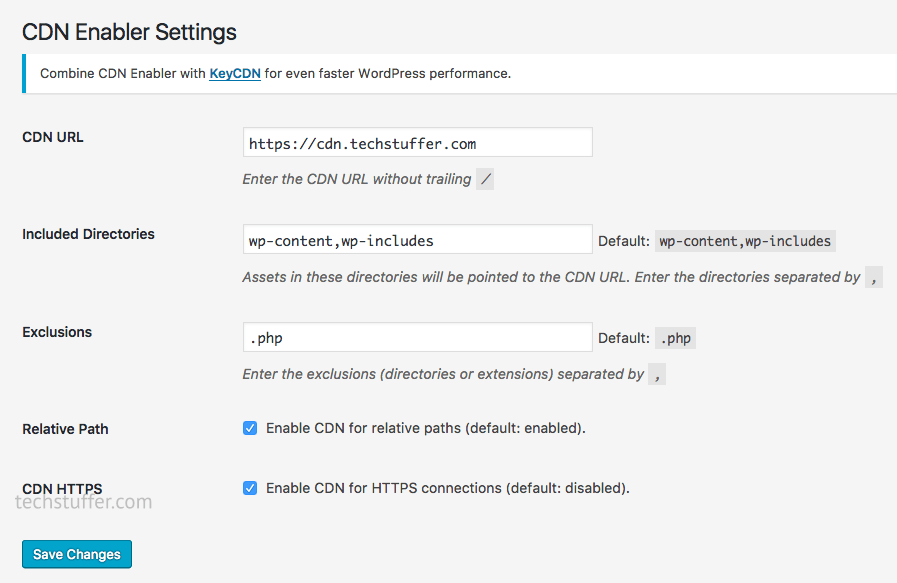
Save the settings and you are done.
If you are using a cache plugin like W3 Total Cache, it should have a setting called CDN where you need to enter your CDN URL. For W3TC, you need to choose Generic Mirror under General Settings > CDN and enter your CDN URL in CDN page.
Save settings, clear the cache and you’re good to go.
Step 6: Checking Whether CDN Is Working
Your zone alias should have been deployed by now and your WordPress site should be able to serve its content from CDN. To make sure it is working as intended, browse your site’s few pages and have a look at its source.
Open any page of your site and right click on the page, select View Page Source and have a look at the source. You should be looking for a static content like style.css and its URL should begin with your CDN’s path.
An example would be https://cdn.example.com/wp-content/themes/example/style.css. If you did not configure a zone alias and used the default KeyCDN URL, it should look like https://exmpl-12Xx.kxcdn.com/wp-content/themes/example/style.css. If any of these is present, you have successfully configured your site to load its assets from CDN.
There are other ways to check if your CDN settings are deployed properly. You can use Chrome’s Developer Tools available under Settings > More Tools. Select Network tab here and load your site. You should see all the assets that your site loads and where it loads them from.

Another way is to test your site with Webpage Test. Enter your site’s address and start the test. Once the test is finished, go to Details tab. You will be able to see all assets loaded by your site along with their location.
If your site appears to load its assets from your CDN URL, then you have successfully configured your WordPress site with KeyCDN. Congratulations! Your visitors are now ready to enjoy a website that loads faster than ever!
http://gph.is/19z2siw
Making Sure of Desired CDN Performace
Now that you have configured KeyCDN with WordPress, it’s time to make sure you are getting the desired performance. You should now test your site with tools like Pingdom, Webpage Test, GT Metrix, KeyCDN’s performance test tools, Sucuri Load Time Tester etc.
What you should be looking for is to have better Time to First Byte, total load time, connection time etc. Pingdom and Webpage Test allows you to change the test location. You should test your site from different locations to make sure everything works fine. KeyCDN’s tools will show your site’s performance from 14 different locations at the same time, giving you a better idea of your end-result.
You can also use Bytecheck to check your site’s Time to First Byte.
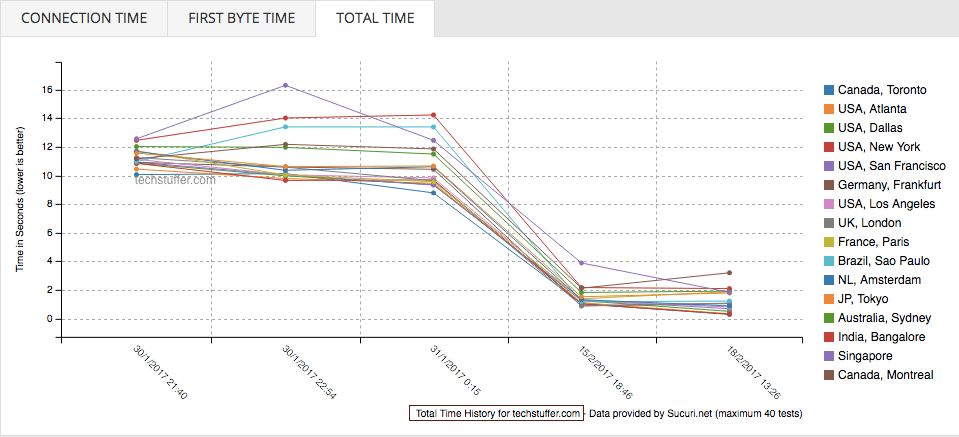
Look at my site’s result in Sucuri Load Time Tester. Notice the dramatic change in total time before and after using KeyCDN.
Things to Keep in Mind
There are a few things about using CDN that should be kept in mind. Content Delivery Networks are not supposed to be magic wands or a button that you press and your site starts loading in a blink. You need to make sure you have a better host, performance-oriented theme, optimized database etc. on top of a CDN.
You images should be compressed, and the number of external scripts should be kept to a minimum. Don’t use unnecessary plugins to add new functionalities.
Also note that some resources are not meant to be loaded from a CDN. Take wp-emoji-release.min.js as an example. If you don’t want to use emojis on your site, you better disable the function.
You can also start loading Google fonts from your CDN instead of making additional calls to Google.
In short, a CDN can not speed up your site alone. It can improve the speed of your site dramatically but you will get better results when you optimize your site in addition of using a CDN service like KeyCDN.
How to Configure KeyCDN with WordPress: Summary
Well, congratulations! You have just learned how to configure KeyCDN with WordPress. In order to make this work, you created a KeyCDN account, created a zone, added CNAME entry in DNS, created zone alias and configured a plugin to tell WordPress about your CDN settings.
You also tested your site’s performance with different tools from different locations.
If everything went as smoothly as expected, your site should be getting benefits of a powerful CDN service by now. Your visitors should be happy to see your site loading quicker for them.
That’s it, folks. This was Parvez and your were reading How to Configure KeyCDN with WordPress: A Step By Step Guide on Tech Stuffer. I hope you found this tutorial informative and I would like to thank you for reading.
http://gph.is/1bDbddV
If you found this article worth your time, please share it with your friends.
I will be back with some more articles soon. Until then, have fun with your faster, better WordPress site.
If you haven’t started your KeyCDN trial yet, go ahead and do it now. You get $10 credit and 250GB bandwidth free for 30 days if you create an account by following my link. No need to provide a credit card. You get only $1 credit and 25GB bandwidth if you signup directly.
You can cancel your trial anytime.
Support Me: If this article/tutorial helped you today, please consider supporting me and help me run frunction.com


