WebP – an image format developed by Google, has been around for many years now. Google claims that WebP provides ‘superior’ lossless and lossy compression for images. According to their tests, WebP images are 26% smaller than PNG and 25-34% smaller than comparable JPEG images.
Images usually contribute the most to the total size of a web page. It is always recommended to use optimized images on websites to make them load faster. By using WebP, the size and time taken to load a page can be dramatically reduced.
This article is not about why or why not to use WebP. It is not my intention to compare it to other formats, either. In this quick and simple tutorial, I will show you how to serve WebP images on a WordPress site.
Note: It is assumed that you know what WebP is and the pros and cons of using it. You can read more about WebP on Google or Wikipedia.
Serving WebP Images on A WordPress Site
Method 1: Using Jetpack
Automattic’s Jetpack has supported WebP since December 2015. If you are using Jetpack on a self-hosted WordPress site, you can simply enable Photon from its settings. After enabling Photon, your WordPress site will start serving WebP images on compatible browsers.
I personally don’t prefer Photon as it caches an image forever. Plus, it adds a query string at the end of each URL of a photo. If you are okay with having no control over your images, you can use Photon.
Method 2: Using EWWW Image Optimizer and Cache Enabler Plugins
Another way of serving WebP images on your WordPress site involves two plugins: EWWW Image Optimizer and Cache Enabler by KeyCDN (my CDN provider) – which will create a WebP version of an image and serve it, respectively.
To begin with, head over to Plugins > Add new in your WordPress dashboard. Now install and activate both EWWW Image Optimizer and Cache Enabler plugins.

Once both plugins are activated, go to Settings > EWWW Image Optimizer. Now go to WebP Settings tab and turn on the JPG/PNG to WebP option. Save the settings.
By doing this, we just told the optimizer to create an additional (optimized) image with WebP extension.

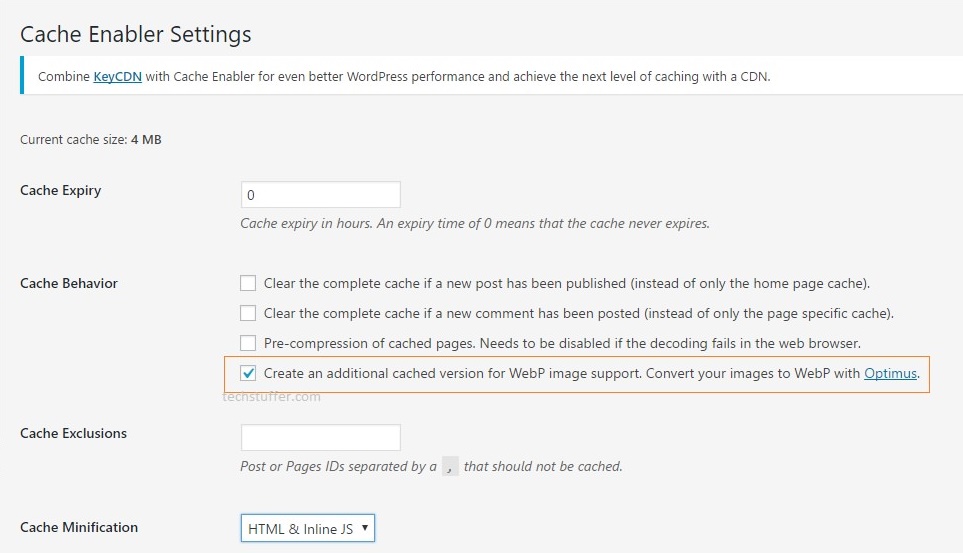
After this, we will head over to Settings > Cache Enabler. Look for Create an additional cached version for WebP image support option under Cache Behavior and turn it on. Now save the settings.

By performing this step, we told Cache Enabler to serve WebP images on a compatible browser when a WebP version of an image is available.
Even after turning on WebP image support via EWWW and Cache Enabler plugins, our WordPress site isn’t quite ready to serve WebP image to visitors. What needs to be done as the last step is to generate WebP versions of all images that you have uploaded to your site.
To do this, go to Media > Bulk Optimize. Turn on the Force re-optimize option and click Optimize button.
Now EWWW will optimize all images present in the uploads directory. While doing so, it will also generate an additional image file with .WebP extension. This will be done for every image size.
Depending on the number of images and your server’s speed, your images might take some time to optimize. So be patient and don’t close the optimization page.
Checking If WebP Images Are Being Served
Once the optimization process is finished, it’s time to check whether our new settings work. One way to do is to clear all cache and load your site with Developer Tools option in Chrome web browser.
To open Developer Tools, click the settings icon on Chrome and go to More Tools > Developer Tools. Now click the Network tab and load your website.
The Developer Tool will show you all assets that were loaded. We have to look for an image file here. Scroll up or down to find an image file and make sure it shows WebP under Type.
Another way to test your settings is to use Pingdom tools. Go to tools.pingdom.com, enter your site’s address, choose a location to test from, and click Start Test.
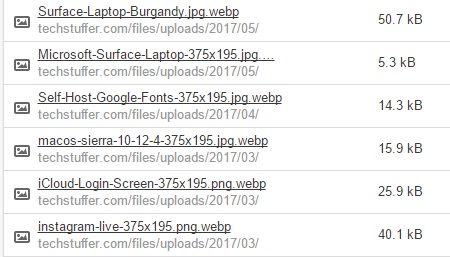
After a few seconds, you will see the test result. Scroll down to find File requests and look for image files there. You should notice that your site served WebP images during the test.

If you see WebP files being served, then good job! You just configured your WordPress site to load WebP images.
If you don’t see WebP images being served, make sure a WebP version of a file is present in your Uploads directory.
To do so, just copy an image file’s URL and paste it in the address bar. Now add .webp at the end of the URL and open it. If the file is available on the server, it will load. If it’s not, then you will see a 404 error.
For example, here’s a URL of an image file on my server: https://frunction.com/files/uploads/2017/05/Surface-Laptop-Burgandy.jpg
I will add .webp at the end and the URL will look like this: https://frunction.com/files/uploads/2017/05/Surface-Laptop-Burgandy.jpg.webp.
If you don’t see WebP file, follow method 2 again.
Note: Just so you know, not all web browsers support WebP images and it includes Mozilla Firefox. Use Chrome or Opera to view WebP images.
Note #2: If you are logged in to your WordPress dashboard, Cache Enabler will not show your WebP images. Make sure to use Incognito Mode in Chrome, or clear all cache.
Summary
WebP images can help reduce the page size and load times without compromising quality. As you can see, serving WebP images on a WordPress site is an easy task and everyone can do this on their site.
What do you think about WebP image format? Do you use it on your site? Have you seen any benefits? Do share your thoughts and experience with me.
Stuck somewhere? Feel free to ask for help in comments.
Want to speed up your site even further? Switch to an affordable CDN service by KeyCDN.
Support Me: If this article/tutorial helped you today, please consider supporting me and help me run frunction.com
