
Hey there fellow bloggers. This is Parvez and in this article I will show you how to configure Let’s Encrypt SSL with WordPress. This will be a small, easy to follow guide. After you complete all steps mentioned, you will have a completely free SSL certificate by Let’s Encrypt and your WordPress site will be migrated from HTTP to HTTPS.
Before beginning, let’s get some idea about SSL, Let’s Encrypt and things required for successful setup. If you already know about them, you can skip to Step 1 right away.
What is SSL and Why Should You Use It?
SSL stands for Secure Socket Layer which is predecessor to TLS (Transport Layer Security). In short, SSL provides encryption during data transmission on the Internet. Without SSL, any data being transferred between your visitor and your server is unencrypted.
Unencrypted traffic can be snooped-over by users with malicious intentions. It is easy for hackers to eavesdrop on sites without SSL -and are prone to attacks like man-in-the-middle attack. If you have any data that should be confidential –like user details, payment information etc., then you must use SSL on your site.
This is why financial institutions use the strongest security possible and their URLs always begin with HTTPS. A site with HTTPS and the green padlock sign means your connection is encrypted.
SSL certs also increases your visitors’ trust in your site. In fact, your site can also gain a small boost in Google rankings. This is why, even if your site isn’t going to have data that should be kept safe, you should consider using SSL.
What Is Let’s Encrypt?
SSL certificates are issued by CAs (certificate Authorities). A genuinely issued cert makes it sure that you have legitimately obtained it and you are the intended owner. The bad part? These Certificate Authorities charge some hefty piece of money to issue SSL certs for you.
This is when Let’s Encrypt comes in picture. Let’s Encrypt is a service provided by the Internet Security Research Group (ISRG). The ISRG is a US-based non-profit and consists of members from organizations like Mozilla, Cisco, Akamai, Electronic Frontier Foundation (EFF) and more.
Let’s Encrypt is a CA itself which issues SSL certs for free. That’s right, completely free! Let’s Encrypt is completely automated and easy to use. You can issue a cert on your own within moments –free of charge. Every new cert is issued for three months –after which it is renewed automatically.
All modern web-browsers recognize SSL certs issued by Let’s Encrypt so you don’t have to worry about your visitors not being able to browse your site.
Sounds good? Of course it does. So let us learn how to configure Let’s Encrypt SSL with WordPress.
Requirements
A Let’s Encrypt-friendly host: Your host should support Let’s Encrypt and provide the option in cPanel. If your host provides commercial SSL service, it probably won’t support Let’s Encrypt in favor of their own SSL business. Get in touch with your host if Let’s Encrypt is not natively supported.
Hosts like SiteGround natively support Let’s Encrypt (despite having their own SSL products). Last time I checked, hosts like NameCheap or GoDaddy doesn’t support Let’s Encrypt.
Some knowledge of cPanel: You will be issuing SSL certificate from cPanel.
Patience and ability to keep calm if things don’t go as expected.
Note: If your domain begins with WWW, make sure to add WWW everywhere your domain is entered in this guide.
How to Configure Let’s Encrypt SSL with WordPress?
Step 1: Issuing a New SSL Certificate
Okay, we will be generating a new SSL cert from Let’s Encrypt. For this, log-in to your cPanel and find Let’s Encrypt. Note that you will find Let’s Encrypt option only if your host supports it.

Enter Let’s Encrypt and scroll down to Install new Let’s Encrypt Certificate.
Select your domain from the list (if you have more than one) and enter an email address you’d like to register the SSL certificate with.
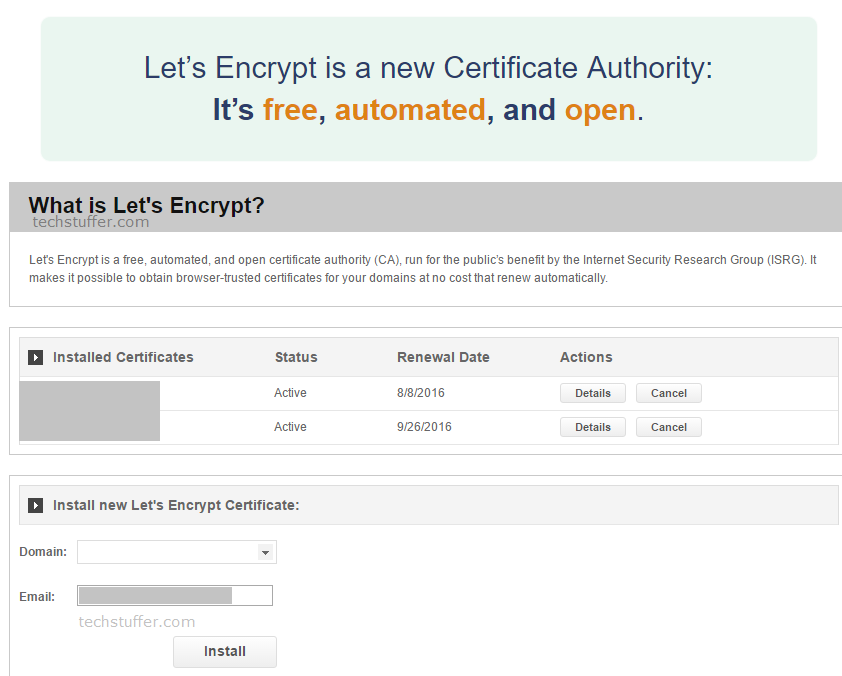
Click Install and let Let’s Encrypt finish its process. It should take no more than one minute to generate a new certificate for your domain.
After a new cert has been successfully generated, you will see it under Installed Certificates. Also notice its status and Renewal Date.
Very well, you have just obtained a new Let’s Encrypt certificate for your domain.
You can now browse your domain by adding HTTPS:// and it should open without warning. If your browser shows certificate warning, then clear browser cache and wait for some time before browsing your domain with HTTPS again.
Once you make sure that your site is being browsed with HTTPS, you can proceed to next step.
Step 2: Configuring WordPress to Work with HTTPS
So your domain has just received brand-new SSL certificate from Let’s Encrypt for free. Thanks Let’s Encrypt! Now you’ll need to configure Let’s Encrypt SSL with WordPress.
To do so, log-in to your WordPress dashboard and go to Settings > General.
You will see Site Address (URL) field there. You’ll have to make a small change here. Replace HTTP:// with HTTPS://. So if your URL is http://mycoolblog.com then it becomes https://mycoolblog.com.

Save the change. Easy! now it’s time to redirect all not-HTTP traffic to HTTPS. Keep reading on next page.
Support Me: If this article/tutorial helped you today, please consider supporting me and help me run frunction.com