Apple’s long-awaited update to macOS has been finally released earlier this week. macOS Mojave has a bunch of new features including a dark mode and performance improvements.
I updated my MacBook Air this Tuesday and I think I see the performance improved over Sierra. My Mac doesn’t have much data and I like completely erasing and then re-installing macOS whenever a new major version is out.
Apple hasn’t shipped macOS updates via CDs/DVDs since a long time. It’s very easy to update to the latest macOS version thanks to the App Store. But if you wish to install the latest OS update using a USB pen drive or memory card, you will need to create a bootable macOS Mojave installer.
In this tutorial, I will show you how to create a bootable macOS Mojave pen drive or memory card. Later, I will show you how to completely erase your Mac and perform a clean installation of macOS Mojave.
Update – 9th October 2019: macOS Catalina is out. Learn how to make a bootable macOS Catalina USB stick.
Update – 12th November, 2020: The latest update to macOS is out now. Learn how to make a bootable macOS Big Sur installer.
Before You Begin
- Make sure you have a pen drive or memory card with at least 16GB of storage.
- Take complete backup of data on your Mac and the USB drive or memory card you will use.
- Make sure you have a working Wi-Fi connection to download macOS Mojave.
How to Create a Bootable macOS Mojave Pen Drive or Memory Card?
Step 1
The first step is to download macOS Mojave installer from the app store.
Open App Store and search for macOS Mojave. Click Download. Wait until the download finishes. The installer is a little more over 6GB. It will take time depending on how fast your internet connection is.
Once the download is finished, the macOS Mojave installer will run automatically. Close the installer.
Step 2
Connect your USB drive aka pen drive aka flash drive to your Mac. Open Disk Utility, select your USB drive and click Erase. Make sure Mac OS Extended (Journaled) is selected in Format. Type Untitled in Name field.
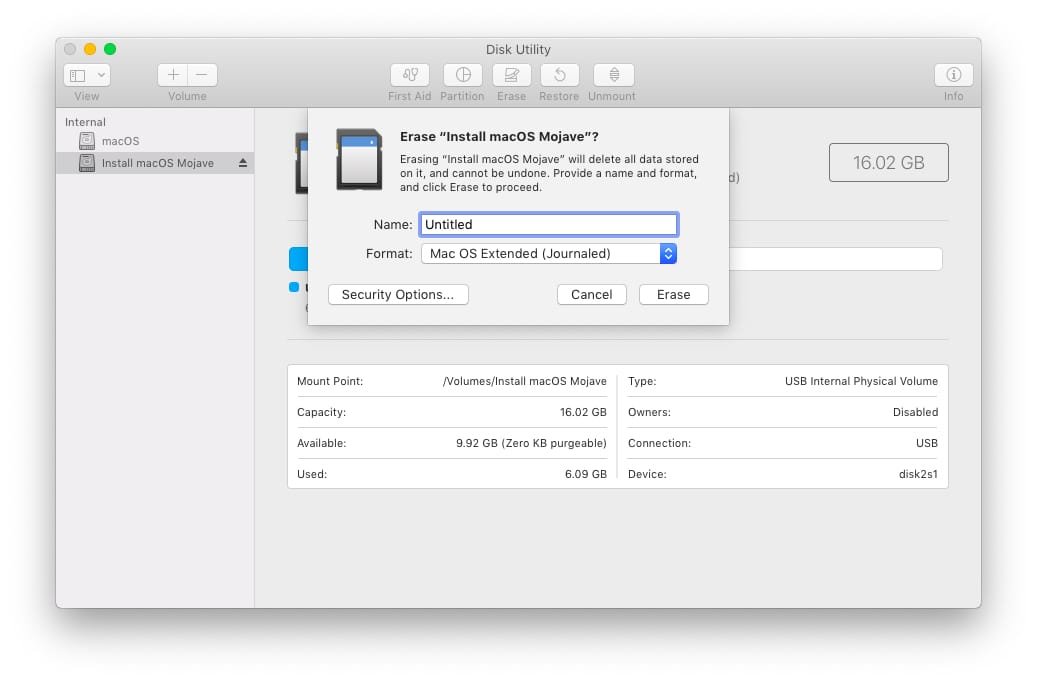
Note: You can name your drive anything you want. Just make sure you change the name in the command in Step 3.
Step 3
Now it’s time to run a command that will make your USB drive or memory card bootable.
Open Terminal. Copy and paste the following command in Terminal window.
sudo /Applications/Install\ macOS\ Mojave.app/Contents/Resources/createinstallmedia --volume /Volumes/Untitled
Note: Replace Untitled with the name of your USB drive/memory card as you chose in Step 2.
Press Enter, type your password, press enter again.
Now type Y and press enter to confirm that your USB volume will be erased.
You will see the progress in Terminal screen which should take about 10 minutes. Once it says the process is finished, you are ready to boot your Mac using this bootable volume and install macOS Mojave.
Keep in mind that when the process is finished, your USB drive or Memory card’s name will be changed to Install macOS Mojave.

How to Install macOS Mojave Using Bootable Volume?
Step 1
Okay, now you have a bootable macOS Mojave USB drive or memory card. It’s time to boot your Mac using this volume and install macOS Mojave.
To do so, reboot your Mac and press and hold Options key when it’s starting up. You should see an option to choose the boot media.
Select Install macOS Mojave and continue.
Let the installer load. Once it’s done, you will see macOS Utilities screen.
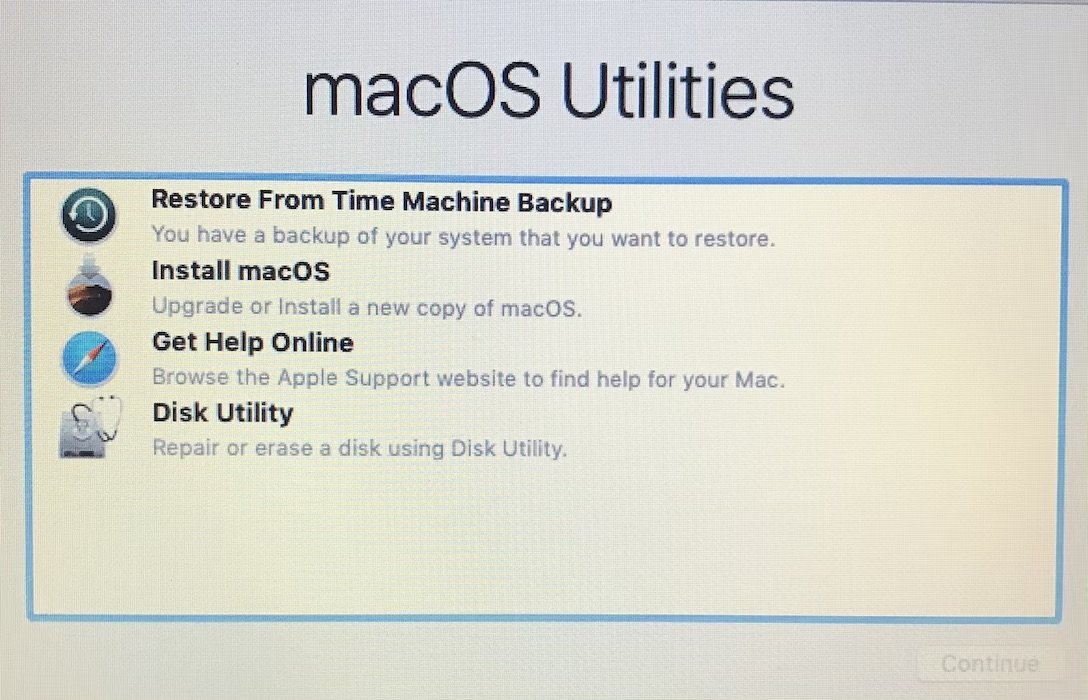
In order to completely erase your Mac and install macOS Mojave, you will select Disk Utilities and click Continue.
Note: If you want to upgrade macOS without completely erasing your Mac, you can select Install macOS Mojave and continue the installation process.
Step 2
In Disk Utilities, select the volume where your current macOS version is installed. It’s usually named macOS. Click Erase. Leave the options as default and click Erase again.
Once the volume has been erased, close Disk Utility.
Step 3
After closing Disk Utility, you will be back at the macOS Utilities screen. This time, select Install macOS Mojave and click continue.
Finish the installation process. Once done, follow the initial setup and finish the process.
That’s all. You just installed macOS Mojave using the bootablbe USB drive or memory card you created earlier.
The same bootable volume can be used to install the latest macOS update on any compatible Mac. So if you have multiple Mac devices, you don’t need to download the update on every device. Just download it once, create a bootable media and install macOS Mojave on every device using the bootable media.
That’s all, folks. This was a quick tutorial showing how to create a bootable macOS Mojave pen drive or memory card. It also showed you how to install macOS using the bootable volume. I hope you found this tutorial helpful.
Update – 9th October 2019: macOS Catalina is out. Learn how to make a bootable macOS Catalina USB stick.
Support Me: If this article/tutorial helped you today, please consider supporting me and help me run frunction.com