
In my previous post earlier, I explained how to configure Cloudflare for WordPress site. Cloudflare is widely used CDN service provider known for providing robust security features. For bloggers, especially those who are using WordPress and looking for ways to speed up and secure their WordPress site for free, Cloudflare is one of the first and best choice.
One of the best features of Cloudflare is Flexible SSL. Cloudflare provides Flexible SSL without charge with their free plan. A WordPress user could start using Cloudflare and take advantage of free SSL certificate. In this tutorial I will show you how to configure free SSL from Cloudflare with WordPress.
What is SSL?
Basically SSL (Secure Sockets Layer) is a standard security technology for establishing an encrypted link between server and client. When you visit Google, or a bank’s site or any other prominent site our there, you might have noticed a padlock sign and HTTPS in your browser’s address bar. Which means the connection between your device and the server is secured and encrypted. An encrypted connection eliminates chances of eavesdropping and data theft by a malicious attacker.
Why do I need SSL on my WordPress site? I don’t have any data that needs to be encrypted.
The answer is simple. Because SSL establishes trust between you and your visitor. Visitors give priority to a secure website. Even Google prioritises secured websites in its search results. And Cloudflare provides its Flexible SSL service for free. If this doesn’t convince you, nothing can.
What is Flexible SSL?
Flexible SSL is a free SSL service provided by Cloudflare. Typically, SSL means the whole connection chain between server and client is encrypted with SSL. With Flexible SSL, the connection between client and Cloudflare is encrypted but the connection between your host and Cloudflare is not. Cloudflare acts as a proxy service so all data requested by client is delivered by Cloudflare, encrypted. One thing which should be taken into consideration is that Flexible SSL is a basic type of SSL and it is not recommended if you are going to store sensitive user data on your WordPress site.
 Image credit – Cloudflare
How to Configure Free SSL from Cloudflare with WordPress?Step 1: Configure Cloudflare
Step 1: Configure Cloudflare
If you haven’t done already, follow this tutorial on configuring Cloudflare and WordPress to work together. When everything is done, come back and follow step 2. If you have already configured Cloudflare and WordPress, move to step 2.
Step 2: Turning on Flexible SSL
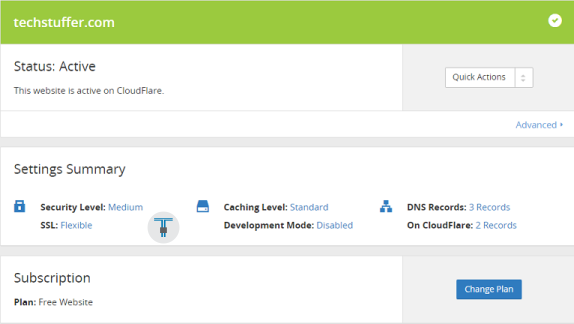
If you kept settings to their default values, Flexible SSL is already turned on in Cloudflare. Check your Cloudflare overview, it should show SSL type as Flexible under overview. If not, go to Crypto and select Flexible under SSL (with SPDY)
Step 3: Configuring WordPress
Go to WordPress Dashboard and go to Cloudflare under Settings. Note that you must have Cloudflare plugin installed. If you followed my previous tutorial, you have already installed it and I asked you to keep HTTPS Protocol Rewriting settings turned off. It is time to turn this setting on. Do so and click Update settings. Turning this setting on will eliminate the “Insecure Content” message in browser.

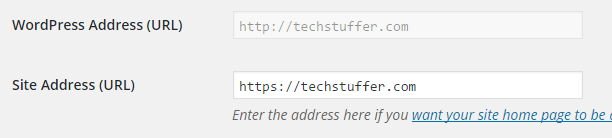
After this, go to Settings > General and add https:// string before your site’s address. for example, http://example.com becomes https://example.com or http://www.example.com becomes https://www.example.com. Save changes.
Step 4: Adding page rule in Cloudflare
Head back to Cloudflare and go to Page Rules. Under Add new role, enter your domain in following fashion: http://example.com/* and turn on Always use SSL switch underneath. Once you turn it on, all other switches will disappear. Please note that if your site is running both with WWW and without WWW, you will have to add two page rules. For example http://www.example.com/* and http://example.com/*
That’s it. We are done here. We have configured free SSL from Cloudflare with WordPress site. Now enter your site’s URL in your browser and it will be forwarded to https://example.com automatically.
What next?
You might be using Google Webmaster. After your site is migrated to SSL, you should go to Webmaster dashboard and add a new site with the URL – https://example.com as Google treats http://example.com and https://example.com differently.
My site is still displaying Insecure Content error.
This is because you might be using one or more plugins which use external scripts to serve content. Read How to Fix Mixed Content Error with CloudFlare SSL and WordPress Configuration
You were reading How to Configure Free SSL from Cloudflare with WordPress on techstuffer.com. If you found this tutorial useful, please share it with others using those shiny little share buttons below.
You can follow me and Tech Stuffer on Twitter and join Tech Stuffer on Google+.
Until we meet next.
Support Me: If this article/tutorial helped you today, please consider supporting me and help me run frunction.com